7.1 Going Vector 
For Cuis-Smalltalk, we built Morphic 3, the third design iteration of these ideas, after Self’s Morphic 1 and Squeak’s Morphic 2. If you already know Morphic in Self or Squeak, most concepts are similar, although with some improvements: Morphic 3 coordinates are not limited to being integer numbers, the apparent size (zoom level) of elements is not tied to pixel density, and all drawing is done with high quality (subpixel) anti aliasing. These enhancements are enabled by the huge advance in hardware resources since Self and Squeak were designed (in the late 80’s and late 90’s respectively). Additionally, careful design of the framework relieves Morph programmers from much the complexity that was required, especially with regards to geometry.
7.1.1 A first example 
Let’s start with some examples. What we want is to build our own
graphic objects, or Morphs. A Morph class is part of the Morph
hierarchy and usually includes a drawOn: method for drawing
its distinctive appearance. If we forget about computers for a second,
and consider drawing with color pens on a sheet of paper, one of the
most basic things we can do is to draw straight lines.
So, let’s start a System Browser window and build a straight line object:
Morph subclass: #LineExampleMorph
   instanceVariableNames: ''
   classVariableNames: ''
   poolDictionaries: ''
   category: 'Morphic-Learning'
In method category drawing add:
LineExampleMorph>>drawOn: aCanvas
   aCanvas strokeWidth: 20 color: Color green do: [
      aCanvas
         moveTo: 100 @ 100;
         lineTo: 400 @ 200 ].
Now in a Workspace execute:
LineExampleMorph new openInWorld
If you get a prompter asking whether to install and activate Vector
Graphics support, please answer yes. There it is. You have already
built your first Morph class.

Figure 7.1: Details of our line morph
The code is self evident, the drawOn: method takes a
VectorCanvas instance as an argument. VectorCanvas
provides many drawing operations for morphs to use. You can play with
the various drawing operations and their parameters, and see the
result. If you make a mistake, and the drawOn: method fails,
you’ll get a red and yellow error box. After fixing your
drawOn: method, do ...World menu →
Debug... → Start drawing all again.. to get
your morph redrawn correctly.
How will you modify our line morph so it draws itself as a cross with an extent of 200 pixels?
Exercise 7.1: Cross morph
7.1.2 Morph you can move 
You might have already tried to click and drag on your Line, like you
can do with regular windows and most other Morphs. If not, try
now. But nothing happens! The reason is that our Morph is fixed in a
place in the owner morph (the WorldMorph). It is fixed because
drawOn: says it should be a line between 100 @ 100
and 400 @ 200. Moving it around would mean modifying those
points. One possible way to do that could be to store those points in instance
variables.
But now, we just want to code our morph in the simplest possible way,
and still be able to move it around. The solution is to make it
subclass of PlacedMorph, instead of Morph.
To do this, first evaluate the code below to get rid of all LineExampleMorph instances:
LineExampleMorph allInstancesDo: [ :m | m delete]
Example 7.1: Delete all instances of a given morph
Then, in the System Browser class declaration for LineExampleMorph, type
PlacedMorph instead of Morph and save. Now execute
again:
LineExampleMorph new openInWorld
You will get a line you can grab with the mouse and move it
around. PlacedMorph adds a new instance variable called
location. If a morph has a location, it can be
moved around, by modifying it. The location also defines a
new local coordinate system. All the coordinates used in the
drawOn: method are now relative to this new coordinate
system. That’s why we don’t need to modify the drawOn:
method. drawOn: now tells how the morph should be drawn, but
not where. The location also specifies a possible rotation
and scale factor. This means that subinstances of PlacedMorph
can also be rotated and zoomed.
7.1.3 Filled morph 
Let’s build another morph, to have more fun.
PlacedMorph subclass: #TriangleExampleMorph
   instanceVariableNames: 'borderColor fillColor'
   classVariableNames: ''
   poolDictionaries: ''
   category: 'Morphic-Learning'
In method category initialization add:
TriangleExampleMorph>>initialize
   super initialize.
   borderColor := Color random alpha: 0.8.
   fillColor := Color random alpha: 0.6.
In the drawing method category add:
TriangleExampleMorph>>drawOn: aCanvas
   aCanvas strokeWidth: 10 color: borderColor fillColor: fillColor do: [
      aCanvas
         moveTo: 0 @ 100;
         lineTo: 87 @ -50;
         lineTo: -87 @ -50;
         lineTo: 0 @ 100 ].
Take a moment to understand that code, to guess what it will do. Now execute:
TriangleExampleMorph new openInWorld
Do it several times, and move each triangle around. Each new triangle you create has different colors. And these colors are not completely opaque. This means that when you place your triangle over some other morph, you can see through it.
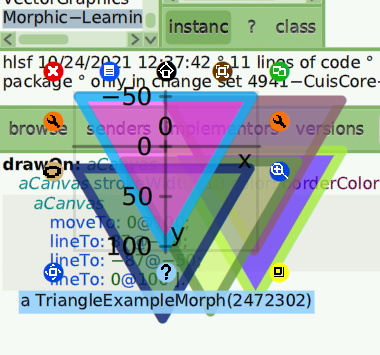
Figure 7.2: A variety of triangle morphs, one decorated with its halo and coordinates system
Exercise 7.2: Rectangle morph
As we learnt previously, Morphic gives you additional ways to interact
with your morphs. With a three button mouse or a wheel mouse, place
the mouse pointer (a HandMorph instance) over one of your
triangles and click with the center button or mouse wheel. If you don’t have
a three button mouse substitute Command-click. You get a constellation
of small colored circles around your morph. This is called the morph’s
halo, and each colored circle is a halo
handle. See Figure 7.2.
At the top left you have the red Remove handle. Clicking on it
just removes the morph from the morphic world. Hover your hand over
each handle, and you’ll get a tooltip with its name. Other handles let
you Duplicate a morph, open a Menu with actions on it,
Pick up (same as dragging it with the the mouse as you did
before). The Move operation is similar to Pick up, but
doesn’t remove the morph from the current owner. More about that,
later. The Debug handle opens a menu from where you can open
an Inspector or a Hierarchy Browser to study the morph.
You also have a Rotate and Change scale handles. Try
them! To use them, move your hand to the handle, and then press the
mouse button and drag it. As you might have guessed, the rotate
handles spins your morph around the center of its surrounding
rectangle. The scale handles controls the apparent zoom
applied to your morph. Both scale and rotation (and also displacement,
as when you move your morph around) are implemented by modifying the
inner coordinate system defined by your morph. Displacement, rotation
and scale are floating point numbers, and thus not limited to
integers.
To change the center of rotation of a Morph, you override the method
rotationCenter accordingly:
RectangleExampleMorph>>rotationCenter
   ^ 0 @ 0
Observe how our rectangle morph now reacts to the rotation handle. We will learn how to control all this with code and animate our morph.
7.1.4 Animated morph 
Let’s add two methods to our TriangleExampleMorph to
make our triangle alive:
In the method category stepping define:
TriangleExampleMorph>>wantsSteps
   ^ true
...and:
TriangleExampleMorph>>step
   fillColor := Color random.
   self redrawNeeded
Then create some additional triangles as you did before.
This will make our triangles change color once a second. But more interesting, edit the method:
TriangleExampleMorph>>stepTime
   ^ 100
...and:
TriangleExampleMorph>>step
   self morphPosition: self morphPosition + (0.4@0).
   self redrawNeeded
Now, our morph steps ten times per second, and moves to the right at a speed of four pixels per second. At each step it moves by 0.4 pixels, and not by an integer number of pixels. High quality anti-aliasing drawing means we can actually do that! You can make it step at a speed of four times a second, and move 1 pixel each time, and see how different that looks.
Now try this:
TriangleExampleMorph>>step
   self morphPosition: self morphPosition + (0.2@0).
   self rotateBy: 4 degreesToRadians.
   self redrawNeeded
It gets even better. First get rid of all instances:
TriangleExampleMorph allInstancesDo: [ :m | m delete]
And modify these methods:
TriangleExampleMorph>>initialize
   super initialize.
   borderColor := Color random alpha: 0.8.
   fillColor := Color random alpha: 0.6.
   scaleBy := 1.1
Accept scaleBy as a new instance variable of the
TriangleExampleMorph class.
TriangleExampleMorph>>step
   self morphPosition: self morphPosition + (0.2@0).
   self rotateBy: 4 degreesToRadians.
   self scaleBy: scaleBy.
   self scale > 1.2 ifTrue: [scaleBy := 0.9].
   self scale < 0.2 ifTrue: [scaleBy := 1.1].
   self redrawNeeded
Then create a new triangle:
TriangleExampleMorph new openInWorld
See that when the triangle is doing its crazy dance, you can still open a halo and interact with it.
Figure 7.3: Animated morph
7.1.5 Morph in morph 
Now, let’s try something different. Grab one of your
LineExampleMorph. With the halo, zoom it until it is about the
size of your triangle. Now place the triangle above your line. Open a
halo on the triangle, click on the Menu handle and select
...embed into →
LineExampleMorph. This makes the triangle a submorph of the
line. Now, if you move, scale or rotate the line, the triangle also
gets adjusted.
You can open a halo on the triangle. To do this, middle-click twice
over it. With the halo on the triangle, you can rotate or zoom it
independently of the line. Also note that when you grab the triangle
with your hand (not using the halo), you grab the
line + triangle composite. You can’t just drag the triangle
away. For this, you need the triangle’s halo. Use its Move
handle23 to position it without getting it out of the line. Use
its Pick up handle to take it with the hand and drop
it in the world. Now, the triangle is no a longer submorph of the line,
and the morphs can be moved, rotated or scaled independently.
But let’s try something. Make the triangle submorph of the line
again. Now add the following method to category geometry
testing of the class LineExampleMorph:
LineExampleMorph>>clipsSubmorphs
   ^ true
The drawing of the triangle gets cut exactly at the bounds of the line. This is most useful for implementing scrolling panes that only make a part of their contents visible, but might have other uses too.
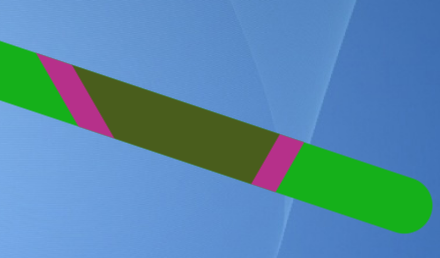
Figure 7.4: An animated and clipped submorph triangle